Saturday 30 May 2009

...Completion


The completed garment. 


Back view, I have put a couple more buttonholes
onto the back straps, and another button on the
waistband for added adjustability.


The purse pocket, I'm very pleased with how well it has
turned out, my only quibble is that because the clasp is
only 10cm wide it is quite awkward to get your hand in!
I should have sewn the lining much smaller so that one
doesn't have to delve too deeply into the pocket.


The buttonhole pocket with the lining fabric as a
contrast for the placket. There is a bit of bunching
of the lining fabric, I did sew the lining pocket so that it
was a bit smaller that the outer pocket, but obviously
not enough.


Tuesday 26 May 2009

Nearing...


The moment of truth - glueing the purse frame onto the
pocket tab, note the masking off of the surrounding area.
The glue is quite strong and whilst it peels off metal,
it does what it is supposed to and sticks very well to fabric.


The magnets have been sewn on with a buttonhole
stitch that just catches the main fabric, hopefully the
stitches won't show too much on the right side.


The sew on magnets, that will be used to support the
weight of the purse clasp, so that it can lay flat against
the body of the garment.


The pocket tab turned to the right side - looking good!


Here the woven hair canvas has been sewn with the main
fabric and lining to create the purse tab.


The final piece was made up in the same way as the toile, except that
the linen fabric has a much softer handle than the calico used for the
toile, so I used the same medium weight iron on interfacing that I used
for the pocket fronts, to stiffen the back straps.
I also used a sew in woven hair canvas - not bought specifically, but a
remnant left over from my youthful home dressmaking days,
I thought it would be ideal to stiffen the purse pocket tab, to give more
support to the shape, yet not be too stiff.

I spent quite a while positioning the paper pattern pieces onto the
fabric, as the printed pattern is quite large there were gaps where
little occurred, but I also wanted to try and retain a sizeable piece
of fabric for a sample.


Sunday 17 May 2009

Lining Fabric


The lining fabric has been simply printed onto a white cotton
base with the same blue/grey ink that was used for the main fabric.
I thought the linear pin pattern could be used for the waistband and
straps, the wire hand for the pocket linings, and the large thread
flower for the bodice...we shall see...

Printing Fabric


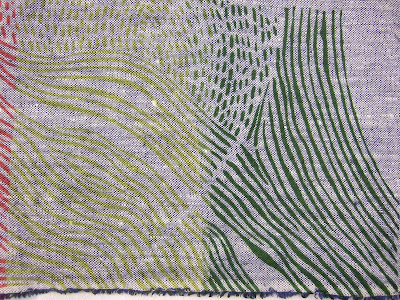
A detail of the print, I rather like it. Pity it has to be cut up!


The final large screen has been printed.


Two screens have been printed.
Oops! I didn't remove the masking tape from that registration
point before a print was taken.


Printing in process, variegated stripes of red ink.


Network of masking tape corners, that plot the movement
of the screen and the subsequent print.


I put the relevant screen over the acetate, so that they
matched, then marked the corners of the screen with
masking tape, so that the print would register in the
correct place.


I marked where the first screen would go, by placing
the acetate where I wanted it to fit with the other pattern.


I marked the fabric where the repeat would go, using the
tracing that the screen was made from.


I decided to go for a fairly subtle effect with the blue grey ink
for the main pattern, with a mix of the reds and
the green grey as other detail.


Deep red, bright red, pink red ink.


Light green, dark green ink.


Blue grey, green grey ink.

Above are some tests to see the colours that I am using for studio
work on the fabric. They are translucent pigment inks.

I decided to use a linen that has a faded denim look - with a white
warp and navy weft.


Initially I was going to use a denim fabric (it was much darker than
the photo depicts) for the garment, I did a test to see if the fabric
would discharge, as you can see from above it didn't work,  I didn't
want to use an opaque pigment ink as it may have blocked up the fine
screen, and I am not especially enamoured at the ink sitting on the surface.
So I had to look for a different fabric?


Monday 11 May 2009

More Progress


I need to make slight adjustments to the length
of the back straps, I left them quite long to allow
for adjustments, though I do think I made them a
little too long - it will be rectified.


View of the buttonhole pocket.


View of the purse pocket. Unfortunately u-handbag.com
have been out of stock of this smaller purse clasp, so I am
saving this one to use on the main garment. I also have
some strong sew in magnets that should help to keep the
flap of the purse clasp upright (the weight of the clasp is quite heavy),
they will need to be sewn in before the pocket is attached to the waistband.


Slipstitch the two edges of the waistband together, slipstitch
the waistband over the pockets. One could also topstitch with
machine stitching.


Press waistband seam and pockets into the waistband


Sew the pockets to the waistband, here they have been arranged
with a slight gap at the centre front.


Press well and place lining into pocket.
Surprised myself at how neat that looks!
Sew across the top of the pocket to keep the layers in place
and the opening aligned.


Turn both the main pocket and pocket lining.


Sew the lining together, trim, notch curves.
Sew the main fabric together, trim, notch curves.


Turn and press, slip stitch the bottom end in place.


Mark pocket opening on lining fabric, stay stitch lines, slash.
A little tricky > sew this lining onto placket over the stitch lines - 
creating a seam whereby the placket is neatened, a little fiddly to
do on the second side, but it seems to work alright.


Right side.


Turn placket to inside and press well - wrong side.


Slash along centre line and cut diagonally to the corners.


Next pocket:
Mark pocket opening on pocket front and pocket placket,
pin placket to pocket front (right sides together) matching
stitching lines, stitch.


Sew back main fabric to main fabric
with pocket.
Sew lining to other lining piece, here I have
sewn the lining slightly smaller than the outer pocket,
so that one doesn't have to delve too far into the
pocket to retrieve those bits and bobs.
Trim seams, notch curves, turn and press.
Miraculously lining fits into pocket!


Sew the two interfaced sections together along 
seam lines to where the hinge would sit- 
ie top and bottom section of the split pocket, 
to the flap.
Do the same with the pocket lining.
Trim, clip, press, turn.


Sew the two smaller pocket pieces together,
around the tab section only, main fabric
with interfacing, lining without. Trim seam and
notch curves. Do the same with the larger pocket
sections.


After several attempts, and plenty of unpicking
I have worked out a way of making the purse/pocket.


Hannah showed me a way of constructing the purse flap,
by making the tab to fit the purse attachment and then
sewing the two separate parts of pocket together.
These two pictures are of Hannah's handiwork, without these
as a guide I wouldn't have known where to start with the
purse pocket. I also consulted the tutorial blog from u-handbag.com
which was indispensable in helping me to construct the purse pocket.